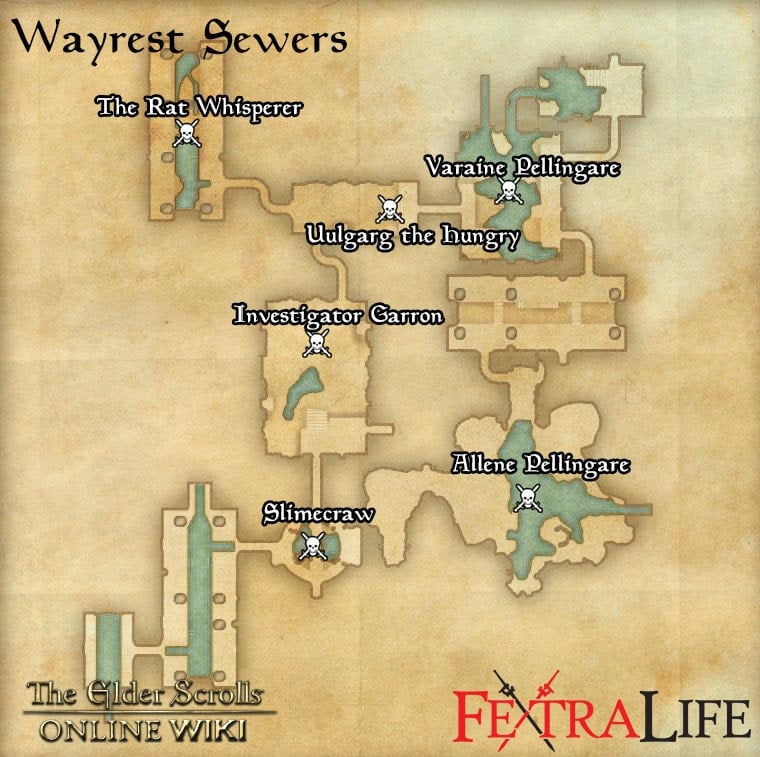
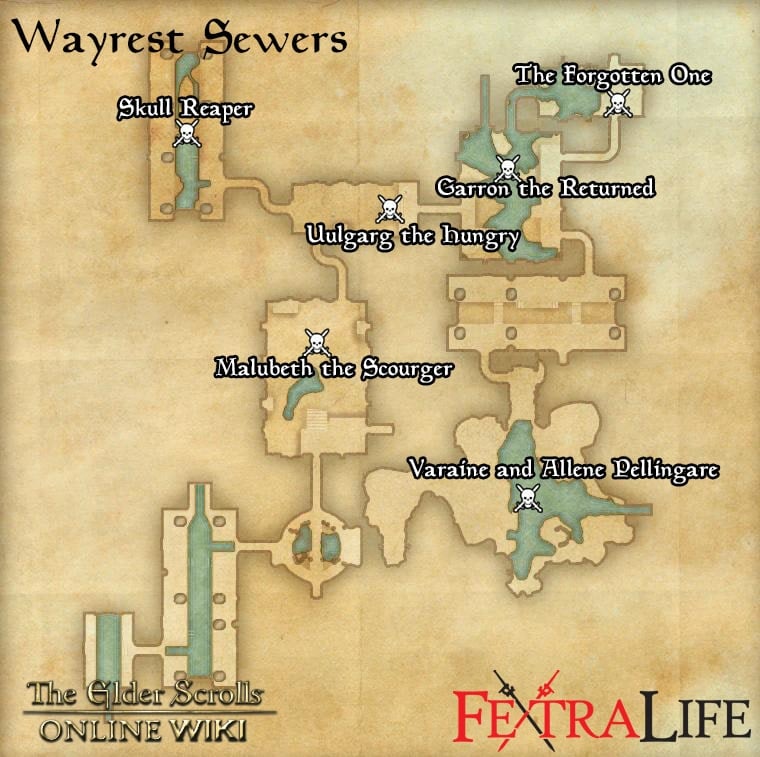
There are multiple versions of this dungeon, please click tabs to see their information, or go to their individual pages.
Wayrest Sewers is the 4-man dungeon in Elder Scrolls Online for players of the Daggerfall Covenant. It is located under the city of Wayrest in Stormhaven. Players can use the Group & Activity Finder tool to easily find groups to tackle this dungeon with.
Veteran Walkthrough & Strategies
Slimecraw
Level:
HP:
Boss mechanics
- Slimecraw has a frontal cone tailswipe. It deals high physical damage and does a pretty big knockback. You do have enough time to get out of the cone, but not too much.
Investigator Garron
Level:
HP:
Boss mechanics
- Garron likes to teleport around the room. Just keep track of him.
The main mechanic in this fight is the green orb Garron summons. It will start chasing after random players, dealing damage to anyone caught in its radius. If the orb is chasing you, run away, but make sure you don’t drag the orb through your group members.
Garron periodically summons two Restless Soul ghosts with 717 Health on the opposite sides of the room. The ghosts have ranged attacks, and they should be taken down asap.
Garron also has a highly damaging ranged knockback which seems to prefer distant targets.
Uulgarg the Hungry
Level:
HP:
Boss mechanics
- The most dangerous ability Uulgarg has is his AOE fear ability. He’ll sometimes fear everyone for a few seconds. Whilst the fear on its own doesn’t do any damage, what follows up might be lethal.
Uulgarg has a nasty heavy melee attack, which deals a lot of damage unless blocked. He also likes to do it right after he has feared everyone. This could potentially kill the tank unless he has enough Stamina to break out of the fear and block the attack.
Uulgarg sometimes stops and does a whirlwind attack around him, dealing physical damage. The damage isn’t high, but there’s no reason to get hit by it.
The Rat Whisperer
Level:
HP:
Boss mechanics
- The Rat Whisperer periodically casts a magic AOE damage spell at the tank, indicated with a red circle.
- The boss shouts “Come to me my minions” as he summons a bunch of low Health skeevers to aid him.
- The Rat Whisperer sometimes casts a cold damage root spell on the tank.
Varaine Pellingare
Level:
HP:
Boss mechanics
- The tank needs to look out for Varaine’s heavy melee attack, and block it.
- Varaine Pellingare periodically casts a quickly expanding AOE spell around him. It deals a lot of damage and briefly stuns anyone caught in it.
- Varaine also does a frontal cone attack, seemingly to a random direction. He has a jump animation associated with the ability, but it’s still very tricky to avoid. Getting hit by the frontal cone attack will knock you down and deal medium physical damage.
Allene Pellingare
Level:
HP:
Boss mechanics
- The tank needs to block Allene’s heavy melee attack.
- From time to time Allene does a Teleport Strike to random targets, which deals a lot of damage and briefly snares the target.
- Allene vanishes roughly every 25% of her Health to summon Fiendish Hallucinations. They are large bats with 562 Health. The number of bats summoned increases after each summon. Normally bats are immune to root effects, but for some reason these bats are not. A dragonknight with Dark Talons will completely destroy them.
- After the last group of bats has been summoned, Allene should be at around 25% Health. Allene takes on a ghost form and seems to deal a bit more damage in the last phase.
Trivia
-
??
Wayrest Sewers Information
- Location: Stormhaven
- Suggested Level:
- Final Boss: Allene Pellingare
- Achievements:
Achievements
- Wayrest Sewers I Vanquisher
- Wayrest Sewers I Conqueror
- Down the Gutter
- Veteran Mercenary Slayer
- Veteran Skeever Slayer
- Wayrest Sewers I Survivor
- Wayrest Sewers I Assassin
Quests
Wayrest Sewers Map
Bosses
- Slimecraw
- Investigator Garron
- Uulgarg the Hungry
- The Rat Whisperer
- Varaine Pellingare
- Allene Pellingare
Set Drop
NPCs in the area
- ??
Notable Items
- ??
Enemies
-
??
Wayrest Sewers is the 4-man dungeon in Elder Scrolls Online for players of the Daggerfall Covenant. It is located under the city of Wayrest in Stormhaven. This dungeon will have players fighting with strange monsters of the deep such as crocodiles and giant rats, which in a large number can prove quite challenging. In Veteran Mode, you will return to fight stronger versions of enemies you once fought, all ready for vengeance. Players can use the Group & Activity Finder tool to easily find groups to tackle this dungeon with.
Veteran Walkthrough & Strategies
Veteran Wayrest Sewers is a rather manageable VR 6-10 Veteran dungeon. The dungeon can easily be completed in less than 20 minutes and can be used as a training farm for VR8+ players to level to VR10 by playing over and over again. All in all, the dungeon makes for a fun play.
Malubeth the Scourger
Boss Mechanics:
- Blue Bolt Attacks that can do medium amounts of damage.
- Red Circles that will be dropped on players at random to deal damage and slow movement.
- Lifting attack that suspends the player mid air and deals damage.
Strategy: The tanks should focus on the Bolt attacks and block those to lessen the damage dealt by them and make your healers job a little easier. The circles will start to turn blue as they deal more damage and you should avoid standing in these circles and move out immediately. Players must be quick to get out of the Lifts as they happen by running towards the Daedric Altars.
Uulgarg the Risen
Boss Mechanics:
-
Fear & Fire Trail attacks that causes all players to leave a fire trail as you run around in Fear.
-
Heavy Melee attack that involves him swinging his sword at players close-by.
Strategy:
-
The deadliest attack Uulgarg the Risen has is the Fear that needs to be interrupted immediately so as to avoid being burnt to a crisp.
-
The melee swing is easy to escape. The key is to just interrupt and stay away from other members to avoid running into their fire trails.
Skull Reaper
Boss Mechanics:
-
4 Healer Skeleton ads (2,500 HP each) that heal the boss
-
Frontal attack that is shaped like a cone and can be fatal if not blocked
Strategy:
-
Attack the 4 ads before attempting to take down the boss.
-
The tank should focus the boss away from the group and block the nasty Frontal attack.
Garron the Returned
Boss Mechanics:
-
AOE circles that are easily avoided
-
4 Ghost ads (2,500 HP each) that can root players and do large amounts of damage, sometimes even fatal.
-
Heavy Beam that can do the most damage
Strategy:
-
Kill or use crowd control tactics on the ads when they spawn as they can wipe you out in a single shot!
-
Be ready for the Heavy Beam attack when Garron the Returned teleports to the center of the room.
-
The healer should be healing all throughout the beam. It is ideal to save up the Ultimate for during this beam.
The Lost One
Boss Mechanics:
-
Loads of ads
-
Frontal wave that can One-Shot Kill you if not blocked
Strategy:
-
The tank should block the wave and face the boss away from the rest of the group. Dont try to avoid this wave as you risk hitting other group members while doing so.
-
The rest of the group should quickly deal with the ads first before dealing with the boss.
Varaine and Allene Pellingare
Boss Mechanics:
-
Circle/Cone attacks from either Veraine that deal minimal damage if blocked
-
Multiple Bats with 3,000-5,000 HP will spawn when the two bosses disappear (NOTE: Sometimes ESO bugs out leaving the bosses still active. Tanks should try to be ready for this)
-
Immunity Shield lasting for upto 20s on the boss with the lower health when the health difference is more than 15%.
Strategy:
-
Block or avoid the cone/circle attacks.
-
Have a DPS on each boss to deal roughly equal amounts of damage each time
-
AOE or crowd control the bats in the middle of the room.
Trivia
-
??
Wayrest Sewers Information
- Location: Stormhaven
- Suggested Level:
- Final Boss: Allene Pellingare
- Achievements: 6
Achievements
- Wayrest Sewers: Defeat Investigator Garron, Varaine Pellingare and Allene Pellingare.
- Veteran Wayrest Sewers: Defeat Malubeth the Scourger, Garron the Returned, Varaine Pellingare and Allene Pellingare.
- Veteran Wayrest Sewers Colossi: Defeat Bone Colossi in Veteran Wayrest Sewers.
- Veteran Wayrest Sewers Zombies: Defeat Zombies in Veteran Wayrest Sewers.
- Veteran Wayrest Sewers Speed: Defeat Varaine Pellingare and Allene Pellingare within twenty minutes of starting Veteran Wayrest Sewers.
- Veteran Wayrest Sewers Undaunted: Kill 15 zombies while fighting Varaine Pellingare and Allene Pellingare and then defeating them.
Quests
Wayrest Sewers Map
Bosses
- Skull Reaper(Optional)
- Uulgarg the Risen
- The Lost One
- Malubeth the Scourger
- Garron the Returned
- Varaine and Allene Pellingare
Set Drop
NPCs in the area
-
Gederic Serre
-
Investigator Irnand
-
Investigator Lienne
-
Kidnapped Peasant (Veteran)
-
Yahyif
Notable Items
-
Beware: Undercity Ruffians
-
Journal of Master Pellingare
-
The Art and the Madness v. 1
Enemies
-
??
 Anonymous
Wayrest I is one of the easiest soloable 4-mans I've ever done (stamsorc). It's also pretty quick so if you're dead set on the toothrow stuff don't be afraid to jump in and pwn this one.

 Anonymous
I've been looking around online for confirmation of this but haven't found it yet. Everyone says Allene Pelligare's teleport strikes are unpredictable but tonight when I finally tanked her for the first time (I'd been up against her before as a healer and as a dps but never as a tank) I saw a predictable pattern. Periodically she does a super-heavy attack that throws even a blocking tank about 10 feet. Next is a spinning attack. THEN she turns around and teleport-strikes one of the dps (she doesn't seem to go for the healer), that usually kills them, even when blocking. I still have to study her more but with the teleport strike she seems to go after the dps who is furthest away and it also seems like she might do more damage the greater the distance traveled (a lot of the new Tamriel One bosses have moves that discourage players from being too far away). Another hint: bat-time is break time to res and regain resources.


I went into this dungeon yesterday as part of a group and none of us could find the way out of the first round room where Slimeclaw is. We could see on the map where the exit should be but it was not visible to any of us. We all just bailed on the dungeon. Help!
0
+10
-1