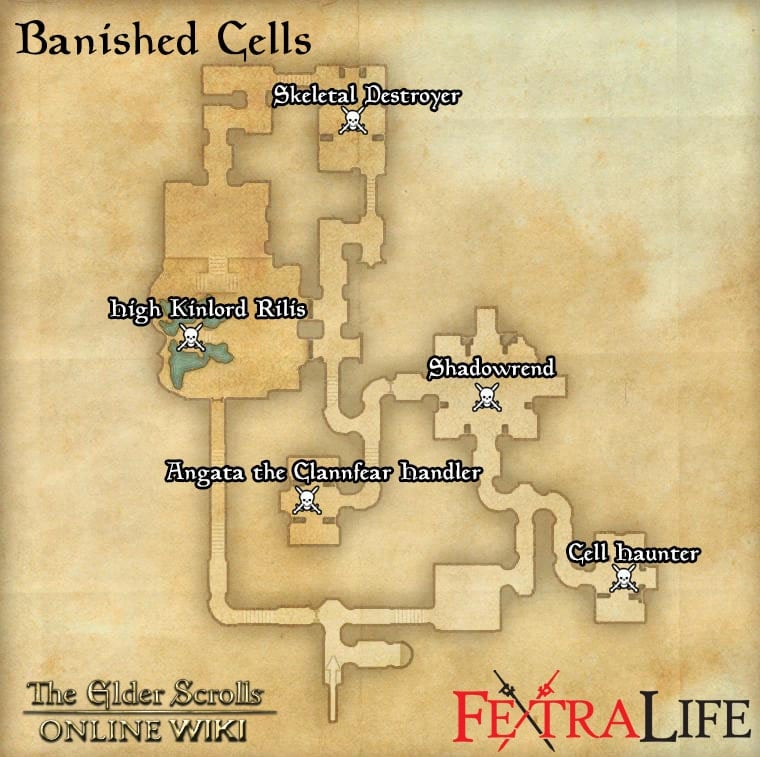
Banished Cells is a 4-man dungeon in Elder Scrolls Online. It is located at the northern tip of Auridon. Players can use the Group & Activity Finder tool to easily find groups to tackle this dungeon with.
Veteran Banished Cells Walkthrough
Cell Haunter Strategy
Level: 160
HP:
Strategy
- This is the first boss of the instance and is fairly easy. It has several adds you should dispose of right away and than concentrate on boss’ abilities.
Boss Abilities
- Health leech – Every 15-20 seconds, the boss casts a green line towards a random player and siphons health. The ability cannot be blocked or interrupted, so it is up to the healer to heal through it and the victim to self-shield and -heal if possible. Healers should keep their resource pools available to counteract this ability alone, and players should be mindful of their healer’s position so they are in range of heals.
- Magic Missile – A basic projectile attack that cannot be avoided, but deals neglible damage.
- Ice Tornado – A moving tornado of frost damage that leaves frozen ground in its wake. You can dodge-roll out of the way to mitigate its direct effects.
Shadowrend
Level: 160
HP:
Strategy
- This boss is where new groups and PUGs usually wipe the most. He has several high damage abilities and knowing their mechanics is the key to defeating this boss swiftly.
Boss Abilities
- Tail swipe – 360º AoE with a warning animation and telegraph. Melee DPS has 2-3 seconds to get out of the circle. The tank and any melee DPS remaining in the circle should hold block to avoid being knocked down and to mitigate damage.
- Shadow clone – The boss creates a shadow clone of itself. The clone does as much damage as the boss, but has low health and resistances and thus is easily killed. The moment it appears most of the group should try and kill it; alternatively the group could assign a dedicated DPS to kill it in about three shots.
- Charge and devour – The boss charges a random group member knocking them on the ground and starts devouring them (and their health) very quickly. A groupmate can interrupt the ability by bashing the boss, or the victim may break free on their own.
Angata the Clannfear Handler
Level: 160
HP:
Strategy
- There are a lot of adds you need to dispose off in the beginning of the fight. The first priority is to eliminate the cryomancers, two on each side of the room. They cast ice tornadoes and protective ice walls. DPS should each engage different enemies so no member of the group is targeted by the whole room. The tank should try to pick up the melee skeletons on the way to taunting the boss. Once the adds are dealt with you only have to kill Angata.
Boss Abilities
- Clannfear summon – The only special ability of the boss is to summon a clannfear add every 10 seconds or so. The tank should be prepared to taunt and/or root the add to prevent it devouring allies.
Skeletal Destroyer
Level: 160
HP:
Strategy
- This is a bone collossus boss that starts the fight with four scamps and summons three skeleton adds periodically. DPS should focus on the scamps first, and the tank should try to root the skeletons summoned by the boss.
Boss Abilities
- Summon skeletons – He summons three regular skeletons that are easy to defeat, but can be annoying to a healer. Have one DPS concentrate on killing them. If the skeletons are not killed fast enough, they will self-destruct near a player.
- Ground stomp – He starts an animation with lifting his leg and a red circle appears around him. Melee DPS should get out of the circle, but it is small enough that melee attacks can still hit from just outside. The circle will persist and deal damage over time to whoever stays in it.
- Cleave – The boss will cleave players in front of him, preceded by a cone indicator. The tank should keep the boss turned away from allies and hold block for this attack.
High Kinlord Rilis
Level: 160
HP:
Strategy
- Rilis has a number of mechanics players should be aware of: circles of blue fire, healing orbs, projectile and heavy attacks. Players should try to group loosely in a circle around the boss to best deal with his various attacks.
Boss Abilities
- Healing orbs ("feasts") – Two orbs will periodically spawn from Rilis' original starting altar. They float towards him and heal him when they reach him, so one or both DPS players should destroy the orbs before then.
- Ghost fire – Rilis will summon pools of blue ghost fire where players are standing. This is a highly damaging ground AoE and all group members should evacuate the circles as soon as possible.
- Magic bolt – Rilis will turn to a random player, pull back his left arm, and fire a magic bolt projectile. This can single-shot kill DPS with low health or resistances if it is not blocked or dodged, and it also knocks players back.
- Heavy blow – Following the ghost fire attack, Rilis will heavy attack his target (hopefully the tank). This attack is preceded with the yellow sparkle indicator, and the player must block this or suffer knockback and heavy damage.
Trivia
- ??
Banished Cells Information
- Location: Auridon
- Suggested Level:
- Final Boss: High Kinlord Rilis
- Achievements:
Quests
Banished Cells Map
Bosses
Set Drop
NPCs in the area
- ??
Notable Items
- ??
Enemies
- ??
Load more

