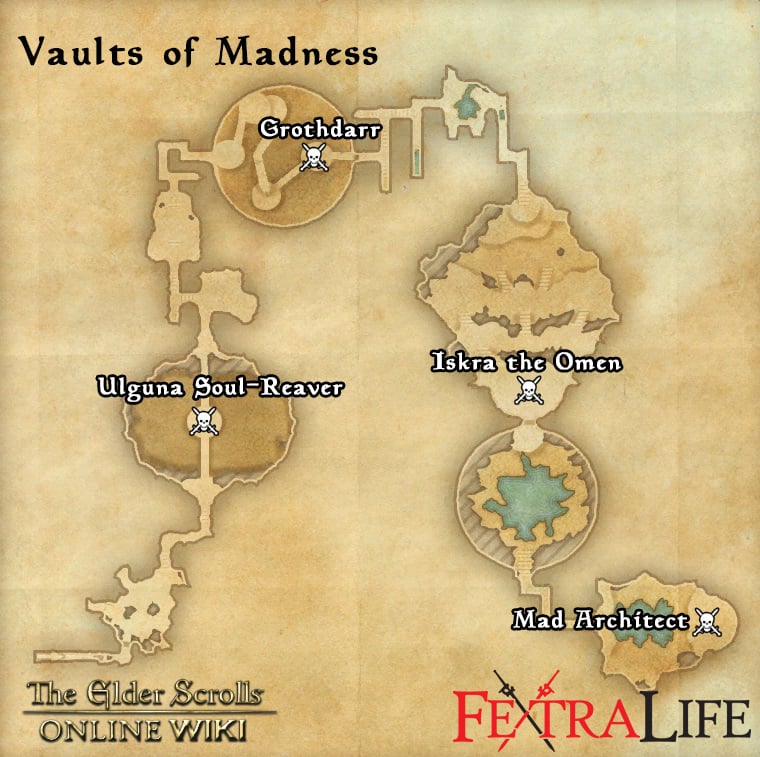
Vaults of Madness is the last 4-person dungeon found towards the center of the Coldharbour region. It is just to the east of the Orchard. Players can use the Group & Activity Finder tool to easily find groups to tackle this dungeon with.
Walkthrough & Strategies
Vaults of Madness is the final group dungeon filled with loads of action.The use of Fighter's Guild abilities are recommended for this dungeon.
Cursed One
Boss Mechanics:
- Skeleton adds.
- Frozen torrent attack, similar to regular wraith enemies.
- Drain Life: target takes the same damage as the Cursed One.
Strategy:
- General
- This is a very straightforward fight, with the only exception being the Drain Life ability. While the Cursed One is channeling Drain Life, all damage dealt by the party is reflected onto the Drain Life target. It is not uncommon for a party member to almost instantly die from this.
- If you wish to avoid a party member death (e.g. for the relevant no-death achievement) then the entire group should cease attacking for the duration of Drain Life.
- Healer
- If the party does not stop attacking during Drain Life, you will be hard pressed to keep the target alive.
Ulguna Soul-Reaver
Boss Mechanics:
- Levitates a player at random, disabling them for about 10 seconds. Cannot be broken.
- Frontal cone fire wave that deals high damage.
- Conjures 4 healing orbs in typical Harvester fashion.
Strategy:
- Tank
- Face the boss away to minimize the fire wave's damage to the party.
- DPS
- Destroy the healing orbs, then focus on the boss.
Death's Head
Boss Mechanics:
- Charges to the front dealing large amounts of damage and knockdown to all in the path.
- Frontal cone Slam attack
- Summons skeletons that explode when low on health.
- Poison runes that spawn on the ground and do damage over time.
Strategy:
- Tank
- If you keep the boss facing a wall or the columns, the fight will go much faster since his charge will be much shorter.
- DPS
- Kill the skeletons before they explode.
Grothdarr
Boss Mechanics:
- Lava that moves around on the platform randomly.
- Overhead attack that can knockdown the Tank.
Strategy:
- General
- Avoid the lava.
- Tank
- Block charge-up attacks.
Archaeraizur
Boss Mechanics:
- Dremora adds.
- Conal fire breath.
- Patches of blue fires on the ground.
Strategy:
- Tank
- Keep the boss faced away from the party.
- Sidestep or block the fire breath attack.
- DPS
- Kill the dremora, then the boss.
Ancient One
Boss Mechanics:
- Standard Watcher attacks.
- High damage AoE, triggered at low health.
Strategy:
- Healer
- Keep the party as full on health as possible to prevent deaths to the spin attack.
Iskra the Omen
Boss Mechanics:
- Leap attack on a random party member.
- Wall of flame targeted towards a random party member.
Strategy:
- General
- If Iskra stops to look at you, he's about to throw a wall of fire your way, and you should sidestep it.
Mad Architect
This boss has an optional hard/Undaunted mode. It can be activated by reading the Scroll of Glorious Battle near the boss, increasing the boss' health and damage output. Defeating the boss while the scroll is active will reward the party with an extra Undaunted Key if they have the appropriate pledge quest.
Boss Mechanics:
- Summons undead minions.
- Grinning Bolt, a high damage single target ranged attack.
- Ground based AoE that snares and deals moderate to high damage.
- A lethal spirit attack that takes up the entire dais the boss stands on.
- A lethal telekinesis attack involving the nearby windows.
Strategy:
- General
- When the sconces lining the walls behind the boss light up, he is about to perform one of his two lethal attacks. You will either need to run onto his platform into the protective shield, or away from his platform depending on the attack.
- Tank
- Despite being a stationary boss, you should keep him taunted to soak up the Grinning Bolt attacks.
- DPS
- Staying at the edge of melee range to the boss will allow you to simply roll backwards and off the dais to avoid the lethal spirit attack.
- The adds are not overly dangerous; you can let them pile up a bit before using AoE skills to take them out.
Trivia
- Grothdarr's lava moves in a manner similar to the classic arcade game Snake.
Vaults of Madness Information
- Location: Coldharbour
- Suggested Level: 47-50
- Final Boss: Mad Architect
- Achievements: 1
Achievements
- Vaults of Madness: Defeat Ulguna Soul-Reaver, Grothdarr, Iskra the Omen and Mad Architect.
Quests
Vaults of Madness Map
Bosses
Set Drop
NPCs in the area
Notable Items
- ??
Enemies
- Achaeraizur (Daedroth)
- Banekin
- Death's Head (Skeleton)
- Flame Atronachs
- Grothdarr (Flesh Atronach)
- Iskra the Omen (Daedric Titan)
- Mad Architect (Lich)
- Soul Shriven
- The Ancient One (Watcher)
- The Cursed One (Wraith)
- Ulguna Soul-Reaver (Harvester)
- Watchers


On Ulguna, add the soulfire bridges, that'll kill you in about 3 seconds flat. Really sucks when the party rushes ahead and leaves you in the dirt on the flaming death-bridges.
16
+10
-1