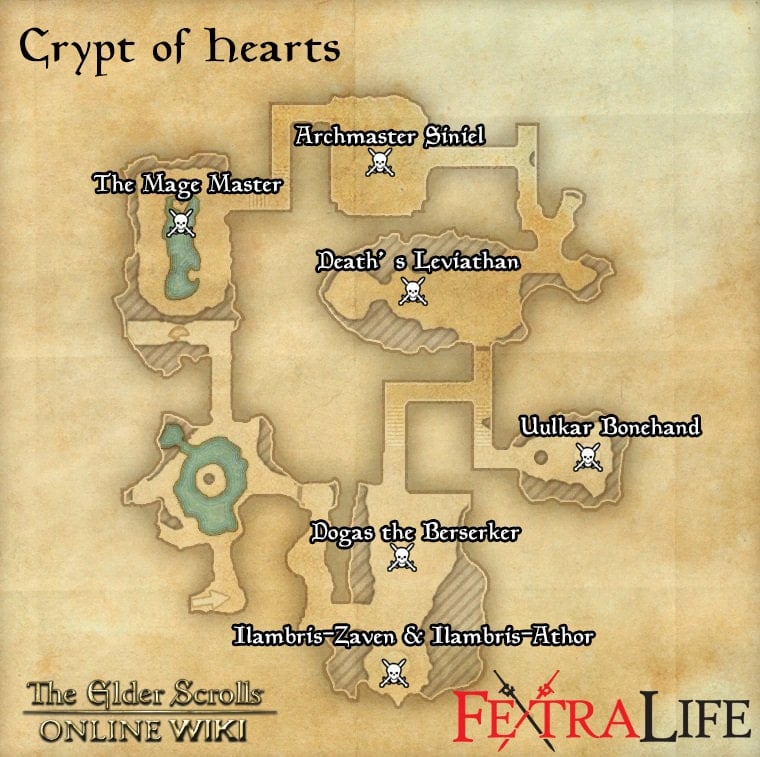
Crypt of Hearts is the third 4-person dungeon in Elder Scrolls Online for players of the Daggerfall Covenant. It is located towards the south-east in Rivenspire. In Veteran mode, this dungeon is quite possibly the hardest at VR12. Players can use the Group & Activity Finder tool to easily find groups to tackle this dungeon with.
Veteran Walkthrough & Strategies
The Mage Master
Level:
HP:
Boss mechanics
- The Mage Master activates a number of skeleton mage adds around the room as soon as he is engaged. Kill the adds before you focus on the boss.
- The Mage Master has a heavy melee attack that needs to be blocked.
- Mage Master casts a blue bubble in a zone around him. The Spell works in a similar way to a Sorcerer’s Negate Magic, except it doesn’t seem to stun you or silence you. Any debuffs on the boss seem to get dispelled if you stay in the zone.
Archmaster Siniel
Level:
HP:
Boss mechanics
- Archmaster Siniel’s most annoying ability is the AOE Fear. Siniel will fear everyone for a couple of seconds.
- Siniel also keeps on summoning undead with 110 Health. Killing them should be simple.
- Siniel casts an red circle of light-green and black stuff. Stay out of it!
Death’s Leviathan
Level:
HP:
Boss mechanics
- The fight can be divided into two phases. The second phase begins when the boss kneels down at a pillar and picks up a flame buff and basically lights himself on fire. All damage he deals is increased in this phase. It’s unclear to me what triggers this phase; it generally seems to happen when he goes below 50% Health threshold, but it could also be a time based thing.
- The second phase of the fight is what will kill you. Because of this, you can take your time in the first phase & save up your Ultimates and resources for nuking him in the second phase.
- The most dangerous ability Death’s Leviathan has is his quickly expanding red circle. He kneels down and places a red circle beneath him, expanding very quickly in size. It’s very difficult to get out of it in time unless you’re already far away from him. In the first phase the damage isn’t too bad, but once the boss has the fire Buff, it can even one shot players.
- Death’s Leviathan periodically charges in a straight line in front of him, marked with a red path. The charge deals a lot of damage and stuns anyone who gets hit by it. It should be easy to get out of the charge in time. Below 50% the charge also leaves a path of fire behind.
Uulkar Bonehand
Level:
HP:
Boss mechanics
- Uulkar places red circles on the ground. After a few seconds, spikes will spring up from the ground, briefly stunning anyone caught in it and dealing damage.
- Uulkar places runes on the ground which snare players in it. The runes on their own aren't very dangerous, but can cause problems combined with his second ability.
Dogas the Berserker
Level:
HP:
Boss mechanics
- This fight is super easy if everyone in your group uses Immovable. You can also just break free from the stun by using Stamina. You’ll be immune for future stuns for a short while.
- It's strongly suggested that the tank pulls Dogas away from the rest of the group, whilst they take care of the adds. After this it’s all about managing the AOE stun he has. It’s a terrible idea to bunch up in this fight, because everyone will get stunned and he’ll be leeching Health from 4 players.
- Dogas jumps in the air and stuns everyone close to him for 4-5 seconds, leeching Health in the process. This is his main ability and this is something that you need to work out how to counter.
Ilambris-Zaven & Ilambris-Athor
Level:
HP:
Boss mechanics
- Once the fight starts, do not leave the arena or it will restart the fight.
- Zaven will periodically charge a massive fire spell. He’ll engulf himself in flames for a few seconds, and follow up with a spell which sends beams of fire across half the room.
- Zaven also places a red circle beneath him, expanding in size. After a second or two the circle will blow up and cause Flame damage to anyone caught in it.
- Athor casts a lightning spell on the tank, dealing slight damage over time.
- Athor periodically casts lightning runes on the ground. Stay out of them.
- Athor has a melee heavy attack which the tank should block.
- As soon as you engage the fight, Ilambris-Zaven, the fire mage, will go to the middle of the platform and stay there for the duration of the fight.
- Ilambris-Athor is the one the tank should focus on, because he moves and has heavy melee attacks which need to be blocked.
- You should probably kill Zaven first to get rid of the annoying fire spells, but do note that Athor enrages and starts raining down lightning after his brother dies. Because of this, you can split DPS between the two bosses and take them down roughly at the same time, eliminating the lightning pool phase.
- Once Zaven is killed, Athor starts raining down lightning from the sky, filling up a lot of the room with pools of lightning. It’s still quite easy to find enough room to stay out of the bad stuff.
Trivia
- ??
Crypt of Hearts Information
- Location: Rivenspire
- Suggested Level:
- Final Boss: Ilambris-Zaven & Ilambris-Athor
- Achievements:
Achievements
- ??
Quests
Crypt of Hearts Map
Bosses
- The Mage Master
- Archmaster Siniel
- Death’s Leviathan
- Uulkar Bonehand
- Dogas the Berserker
- Ilambris-Zaven & Ilambris-Athor
Set Drop
NPCs in the area
- ??
Notable Items
- ??
Enemies
- ??
Load more

