Scalecaller Peak is a 4-player group dungeon located in Stormhaven in The Elder Scrolls Online. It is part of the Dragon Bones DLC. It features Normal and Veteran Modes. Players can use the Group & Activity Finder tool to easily find groups to tackle this dungeon with.
As of Update 17, the last boss of the dungeon drops the Scalecaller Style motifs chapters, and all bosses in the dungeon drop the crafting material: Infected Flesh.
Scalecaller Peak Veteran Walkthrough & Strategies
This is a challenging dungeon in Veteran modes. Players should form a well-geared party at endgame level.
"In Scalecaller Peak, the burial site of a long-dead Dragon Priest is now overrun with diseased cultists harboring an evil agenda: to unleash the deadliest plague Tamriel has ever known. You and your team must journey to Scalecaller Peak, battle your way through the cultists and their followers, and put an end to this threat"
Suggested group composition for Scalecaller Peak
- 1 Tank
- 1 Dedicated Healer
- 2 DPS
Short summary of dungeon goes here.
You will also encounter challenging enemies that teach you game mechanics:
- Skeevers: When a skeever is defeated, a red rings spawns around its corpse that will shoot poison at any players who step into the ring.
- Floating Red Spheres: These orbs petrify players based on proximity. The targetted players will get a red circle under their feet warning them of impending petrification. If the player is petrified, other players can undo the effect by approaching them and using a synergy.
- Nereids: These enemies spawn geysers from the ground, that the tank can stand on and block. They have a limited range for this effect so DPS should stay away from them.
- Ogre Elder: These enemies summon a storm around them that deals high damage, they should be the kill priority of the group.
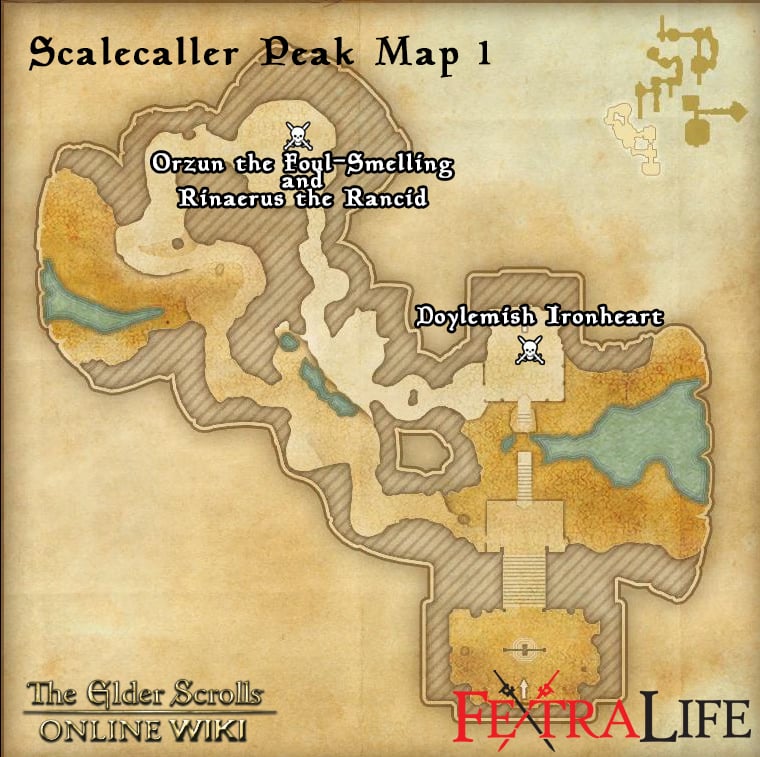
Orzun the Foul-Smelling and Rinaerus the Rancid
Level: CP 160
HP:
Strategy:
These two bosses should be separated - the kite should focus on engagin Orzun the Foul and kiting him around the area. DPS can focus on bringing Orzun's health down, after which they can switch to Rinaerus, with the objective of killing both bosses at almost the same time.
Kill order: Rinaerus then Orzun (must be close together)
Mechanics:
- Orzun has a callout when he is sending an attack towards a player. When you get this announcement, purposefuly freeze yourself for protection by running into the yellow circles that populate the battleground thanks to Rinaerus. Wait for the Iceball attack to hit and break you out of the freezeDon't break out, let the iceball hit you, it'll break you out. Only one player can use each circle once, so do not defeat Rinaerus before you're ready to defeat both bosses.
- Rinaerus casts a large and deadly storm that can only be avoided by using the Ice pillars that pop up thanks to Orzun. Whenever this happens, hide behind a pillar to stay safe. Several players can use the same pillar.
Tank: Staying towards the outer circle of the arena is a good tactic for avoiding Orzun
DPS+Healer: Rinaerus will periodically summon Skeevers and needs to be interrupted with a bash or an interrupt skill such as Crushing Shock.
Doylemish Ironheart
Level: CP 160
HP:
Strategy:
Doylemish Ironheart is an unchallenging boss for a well-prepared group. It is important for the group to quickly DPS and outrun the Floating Spheres that can petrify you, but otherwise the boss has simple mechanics. The boss also summons Ice Wraiths, that must be aoe-killed so that they don't overrun the tank.
Mechanics:
- Floating Red Spheres: They target a player and follow them, so kite it while dpsing from a distance
- Boss summon: You should aoe-kill the wraiths
Tank: Tank the boss in a corner near the exit door. The heavy attack can be dodged and the tank is rarely the target of petrification. Have your healer purify a bleed if you get one
DPS: Focus-dps the floating balls as soon as possible, do not get caught by them. Use your ultimate when the boss is still and no spheres are around.
Healer: Having shards or recovery helps the tank, you can also slot a purify skill to assist. If any player gets petrified, assist them as soon as possible.
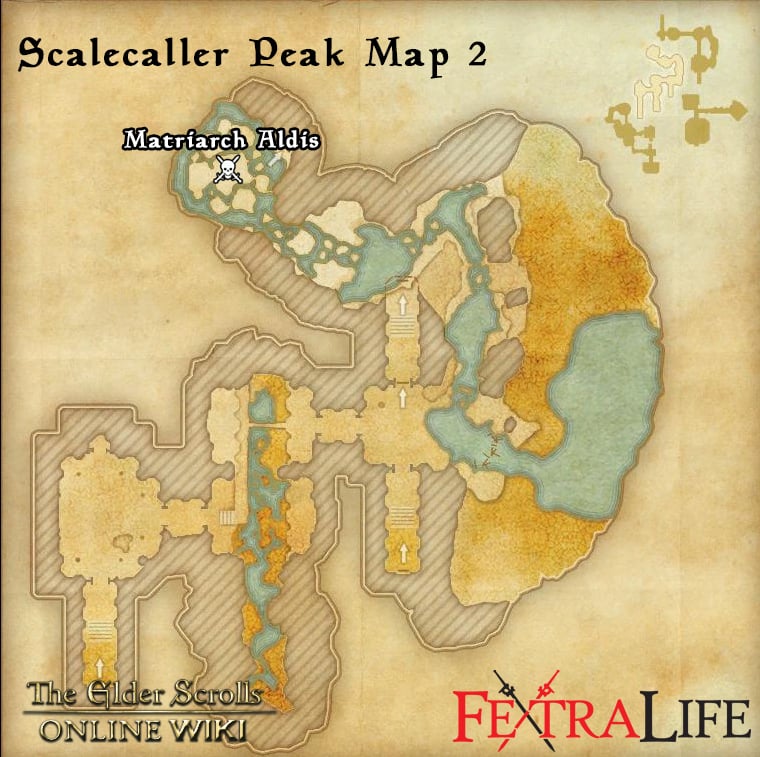
Matriarch Aldis
Level: CP 160
HP:
Strategy:
Matriarch Aldis is in a zone similar to the Maelstrom Arena, with mechanics akin to the Bloodroot Forge lava pit: the water freezes and kills players that stay in it. The boss will periodically summon Nereids that produce deadly geysers, so they should be the N.1 priority for the party.
Mechanics:
- Water Freeze: The water is deadly, stay out of it
- Nereids: High damage from geysers that the tank must find and plug, kill them first
Tank: The easiest way is to lure the boss to the edge of the area and let the dps stay outside, killing the boss without worrying about the Nereids.
DPS: Focus-dps the boss and assist in regeneration for the tank
Healer: Max heals on the tank and as much regeneration as you can.
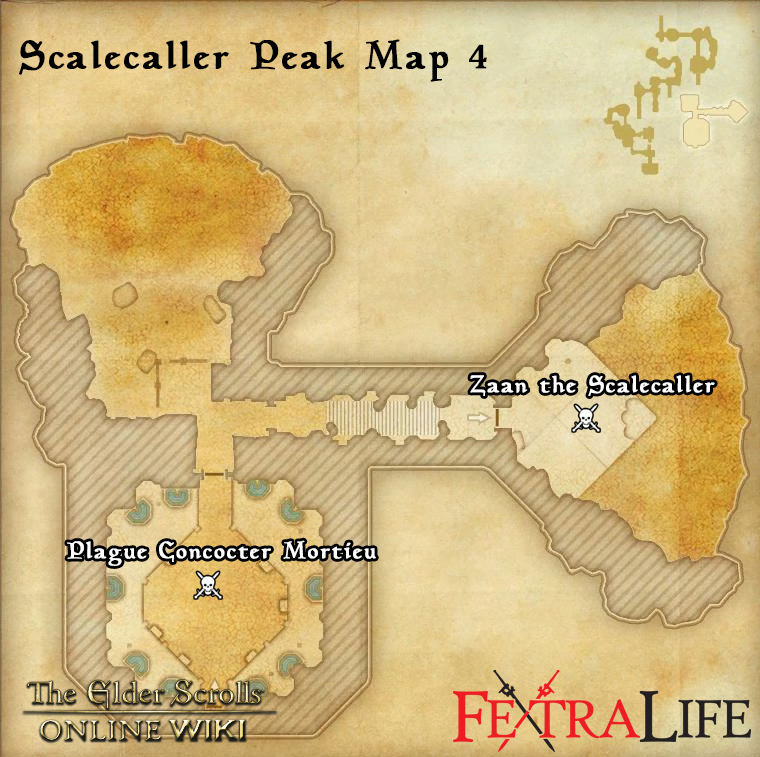
Plague Concocter Mortieu
Level: CP 160
HP:
Strategy:
This is a complex fight that has a constantly building poison debuff on the entire party. The first debuff increases Stamina costs, the second decreases Healing Received, and the third increases Magicka costs. Players must kill specific enemies and make an antidote to cleanse themselves from the debuffs and massive damage. Listen to Jorvuld as there are callouts for what each phase needs. It's usually first Imps, then Stranglers, then Beetles. Once you have killed all necessary adds and obtained the antidote you can run to the middle of the arena for a cleanse and then get to the boss, who will be weakened. A guard will likely also appear, so use your ultimates when both the guard and the boss are there.
Mechanics:
- Tiered poison: an ever-increasing poison that will wipe the party if not cleansed
- Antidote: kill the adds in the order of the shoutout to ensure you can get the antidote, cleanse yourself in the middle, and then drop your ultimates on boss and guard
- Guard: a guard joins the frey whenever the boss is made to stumble, and must be killed quickly
Tank: Most of the damage on this fight is unavoidable and cannot be tanked, so your role will be to stand on the geysers to prevent their poison from overwhelming your healer. Keep the boss on you with a ranged taunt, and wait for the antidote phase to come around then use a taunt to ensure the spawned guard comes straight to the boss location so you team's ultimates can get them both.
DPS: Kill the adds as per the callout to generate the antidote, and charge your ultimates while doing it. Cleanse yourself, then drop ultimates on the guard+kneeling boss for maximum damage. Regeneration and self-healing are important in this fight
Healer: The tank will take the bulk of your damage but the team will need heals. Try and bring aoe heals that can assist, and both a healing and dps ultimate so you can help with dps if possible.
Zaan the Scalecaller
Level: CP 160
HP:
Strategy:This is a difficult fight that will take some time getting used to. The boss spawns Ice Giants every 20% health loss, and if you don't kill these two enemies quickly they will wipe out your party. Managing party positioning, callouts and taking on the Ice Giants is the key to success.
Mechanics:
- Poison Breath Statues: If you look at the arena, you will notice three statues at the back with dragon heads. Each of these will spit out a deadly one-hit-kill poison AOE in a triangle/cone fashion. The sections are smallest near the statues, so some players prefer to stay near them. The other strategy is to stand back in between two of them and quickly step from one to the next. DO NOT ROLL - it is not dodgable
- Fire Breath: A callout that "Zaan's breath is following you!" and a red circle under your feet indicates waves of fire are coming to your character, getting anyone in the way. You can block them off with the pillar on the arena, or you can simply step from side to side to avoid each wave of flame.
- Fire Beam: The boss selects a player and creates a fire beam effect that deals massive damage. Other team members can disrupt this beam and take some of the damage - it is best if the tank does it, but sometimes all other members can rotate through the beam to distribute the hurt and avoid a death.
- Ice and Poison Storm: Every 20% health, the boss will summon two Ice Giants that begin channeling a storm. This storm will kill everyone immediately so they are the n.1 priority for dps, tank and heals during this phase.
- Shield Safety: After the Ice and Poison Storm, a circular area around the shield will shine denoting all players should get to it as soon as possible. Get inside to avoid being killed, then get out to avoid being hit by the boss.
Tank: Tank the boss near the middle of the arena, picking one of the cone areas. Your main job is to keep her on you and protect your allies from the deadly fire beam.
DPS: DPS the boss and save your ultimates for the right moments. The two giants she summons must be defeated quickly so stay in good communication with the other dps to distribute damage and kill them fast. Pick a sector you will stand on to avoid the poison breath from the statues
Healer: This is a difficult fight to heal as many things can go wrong. Healing ultimates from the resto staff are great for sustained healing. Focus on the tank and on defending whoever is being targeted by the fire beam. Fast revives can save the battle here.
Trivia
- Dungeon Gallery
Scalecaller Peak Information
- Location: north of Wind Keep Wayshrine, in Stormhaven.
- Suggested Level: CP 160
- Final Boss: Zaan the Scalecaller
Achievements
- Scalecaller Peak Vanquisher
- Scalecaller Savior
- Stand Your Ground
- Scalecaller Peak Challenger
- Mountain God
- Scalecaller Peak Conqueror
- On Top
- Peak Performance
- Breaker of Spells
- Veteran Cultist Slayer
- Veteran Ogre Slayer
- Pustulent Problems
- Stony Situation
- Daedric Deflector
- Doctor's Orders
- Tremor Trouble
- Watch Your Step
- Dragon Bones Delver
Quests
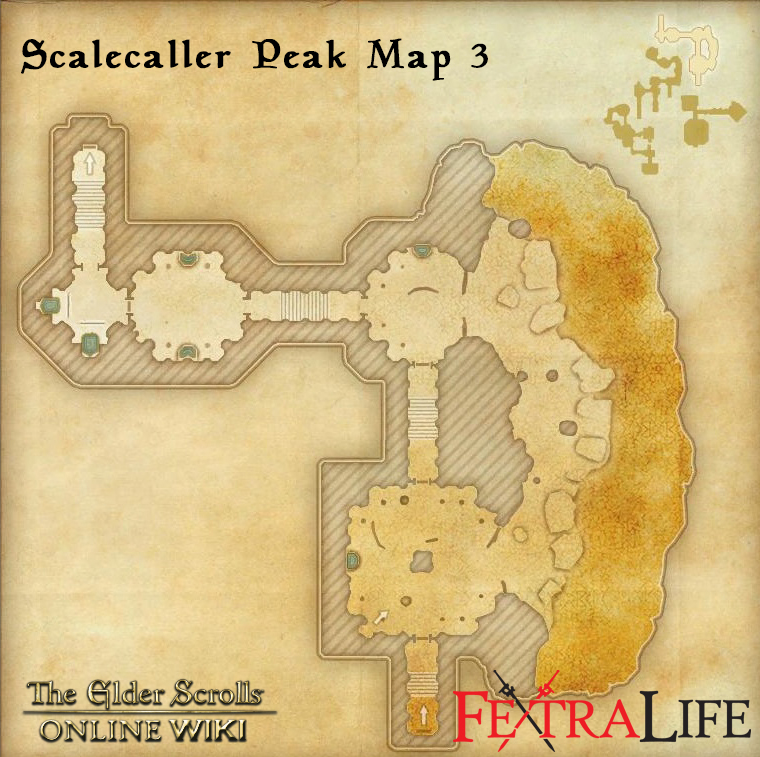
Scalecaller Peak Map

Bosses
- Orzun the Foul-Smelling and Rinaerus the Rancid
- Doylemish Ironheart
- Matriarch Aldis
- Plague Concocter Mortieu
- Zaan the Scalecaller
Set Drop
NPCs in the area
- ??
Notable Items
- ?? Lorebooks
Enemies
- Skeevers
- Floating Red Balls
- Nereids
- Corrupted Leimenid
- Ogre Brute
- Mortieu's Guard
- Pestilent Arcanist
- Pestilent Archer
- Pestilent Brute
- Beetle
- Dire Wolf
- Gargoyle
- Giant
- Harpy
- Ice Wraith
- Imp
 Anonymous
 Anonymous
at one point this was a good site to get info but now it sucks .... where is the info

 Anonymous


i don't like these ogre twins
1
+10
-1