Depths of Malatar in The Elder Scrolls Online (ESO) is a 4-player Group Dungeon located in the sunken city of Garlas Malatar. It is part of the Wrathstone DLC. It features Normal and Veteran Modes. Players can use the Group & Activity Finder tool to easily find groups to tackle this dungeon with.
As of Update 21, the last boss of the Dungeon drops the ?? Style motifs chapters, and all bosses in the dungeon drop the crafting material: ??
Depths of Malatar Veteran Walkthrough & Strategies
This is a challenging dungeon in Veteran modes. Players should form a well-geared party at endgame level.
"Sealed away deep within the sunken city of Garlas Malatr, players must seek out the other half of the Wrathstone Tablet, that is fiercely protected by followers of Meridia. These followers have devoted there lives and very essence to making sure that the Tablet is never again returned to the surface."
Suggested group composition for Depths of Malatar
- 1 Tank
- 1 Dedicated Healer
- 2 DPS
Short summary of dungeon goes here.
You will also encounter challenging enemies that teach you game mechanics:
- Purified warriors
- Imps
- Stone Watcher
- Frost Atronachs
- Radiant warriors
Depths of Malatar is fun dungeon to experience, with 5 bosses and some nasty mob pulls. Bosses are mostly not terribly difficult to get through, except the last one which can be pose quite the challenge, especially in Veteran Mode. Trash that you find between boss fights are mostly common ones that just need to be stacked and countered with AoEs.
However after the easy early pulls, Stone Watchers are added to the mix making the fight much tougher. They have wide a variety of attacks but mostly focus on AoE damage. The rest of the group should not be positioned closely to doughnut-like AoE and only the Tank should stay inside it. It does significant damage and can kill DPS and Healers easily.

While other mobs are nothing special, Stone Watchers can pose a problem
For the most part, these stone watchers do not arrive on their own, and come accompanied with additional common mobs, that you have encountered previously. Focusing on smaller adds first with the Tank keeping Stone Watchers busy is the way to go.
This dungeon comes with 2 modes: Normal and Veteran. Sets that drop in this dungeon are:
- Auroran’s Thunder Set
- Scavenging Demise Set
- Frozen Watcher Set
- Symphony of Blades Monster Helm (Veteran)
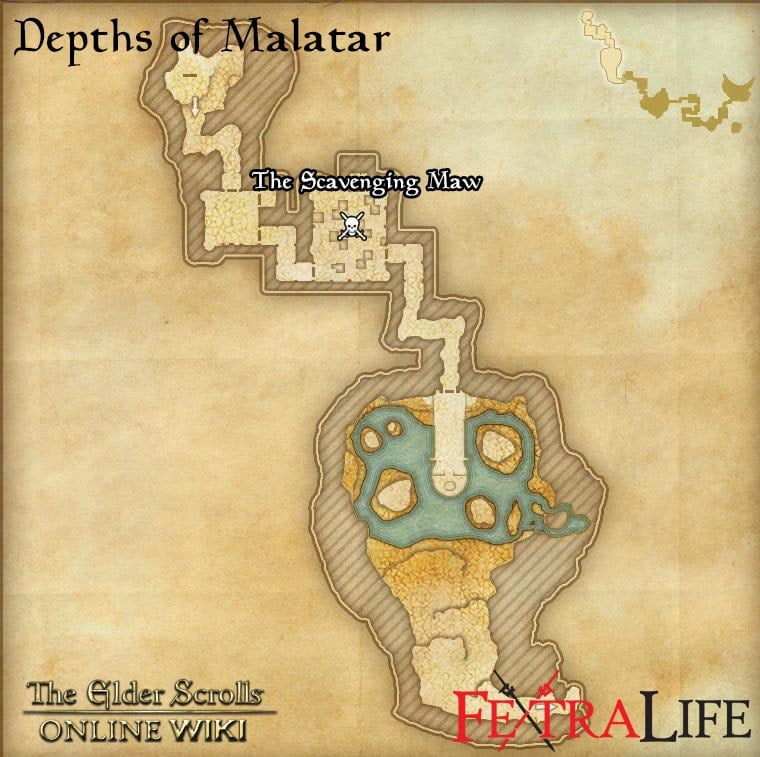
The Scavenging Maw
The first boss you will encounter in this dungeon is The Scavenging Maw, it needs to be taunted and turned away from the group. It does a nasty conal AoE attack that can significantly damage other party members. Tanks can endure this but the problem for this role is the additional ground AoE attack that follow the conal one.

Damage from these two attacks combined can take down a Tank, and that is why it is vital for the Tank to move out of the ground AoE. While this is happening, the boss will also summon additional AoE circles on each player. Make sure these circles do no overlap otherwise huge damage occurs.

Maw does nasty series of attacks. Walk out of AoE circle to avoid lots of damage.
A special mechanic here is when the boss disappears during the fight and it is up to the players to find it. The best way to tackle this is to stick together while searching for the boss, because the boss performs a very dangerous channelling attack upon the player that finds it first. This attack needs to be interrupted.

Maw needs to be interrupted after found because it does massive damage over time
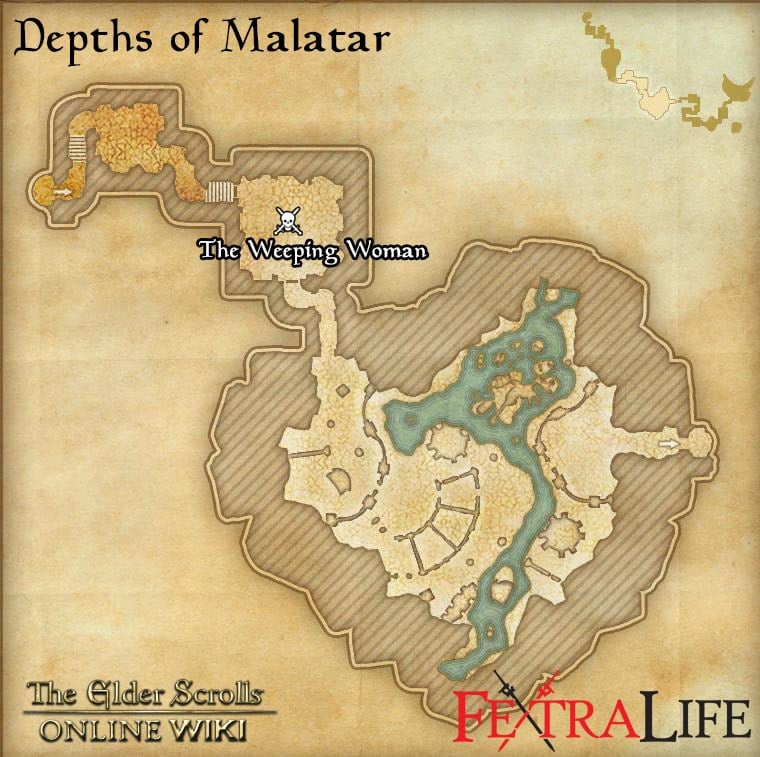
The Weeping Woman
The second boss is less problematic, thankfully. The only mechanics to watch out for are the AoE circles that spawn around the boss, these come in various shapes and forms. It is best to stay outside the any AoE on the ground and you’ll be fine. This fight requires lot of mobility to pull off.

There are adds present in this fight as well which need to be killed ASAP, since the two-handed add deals a significant amount of damage. Prioritise DPSing the adds, followed by the boss.

Only real problem in this fight are adds and AoE but all is easily sorted out
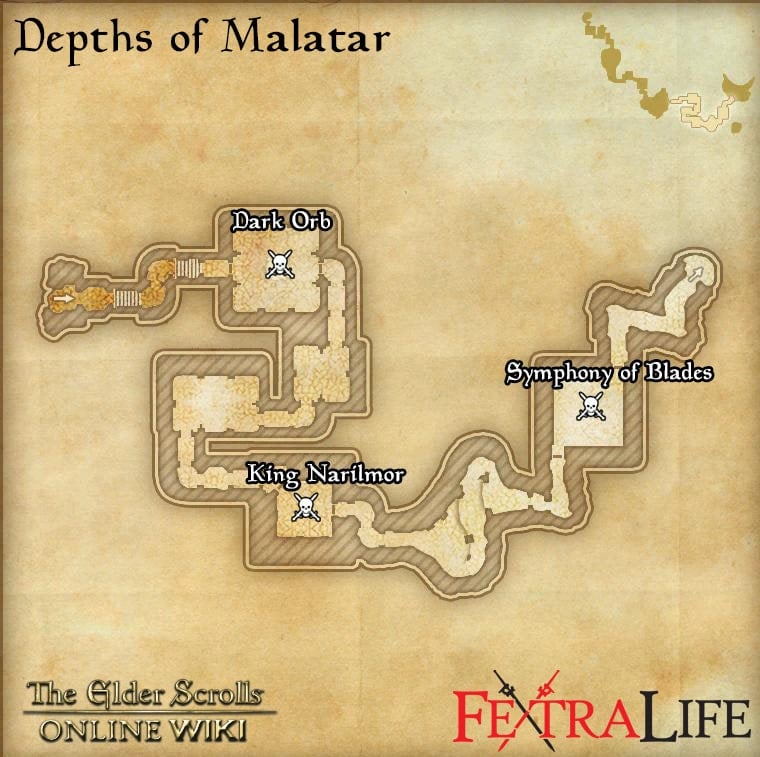
Dark Orb
The third boss is an Orb that is found floating in the middle of the room. The great problem here are the Auroran adds that the Dark Orb constantly heals. They will spawn throughout the fight and the tank needs to keep them on himself at all times.

Either draw the adds away from the Orb while the group stays there constantly, or tank them near the Orb, so that they receive AoE damage. They spawn rather quickly after they’ve been killed, so it is up to you to decide which approach you wish to take. DPS in this fight should focus on the Dark Orb.

Chaotic fight due to Auroran adds being constantly present and being empowered by orbs
The Dark Orb summons 4 more orbs that empower Aurorans. It is obvious when this is about to happen because a warning text appears saying “An Orb is empowering Aurorans”. These Orbs grant the corresponding Auroran a more powerful ability, for example Radiant Orb empowers Radiant Aurorans, Scintillating Orb empowers Scintillating Aurorans etc. Orbs need to be dealt with as quickly as possible. When these Orbs spawn, the Dark Orb cannot be damaged, so there is nothing to do besides killing them and all of the adds, so that the Dark Orb can be damaged once again.
King Narilmor
The fourth boss you will encounter is King Narilmor himself and this boss is not too difficult to deal with. His main mechanic is to split himself into 4 cloned versions. Best way to approach this fight is to get the Tank to gather all 4 clones and for the DPS to lay down AoEs.

Another way to do it is for both DPS to focus on one and take it down fast, then switch to another and so on. After clones have been dealt with, Narilmor gets back to his usual self leaving only one target.

Saving Tharayya by healing her makes the rest of the fight easier
The unique mechanic here is in regards to the NPC Tharayya, at the beginning of the fight she will start battling a ghost. If she losses all clones get a shield buff that makes them more difficult to kill, making the fight far more dangerous. To prevent her from losing, the Healer needs to heal her continuously.
Symphony of Blades
The final boss is quite a dangerous one, due to the use of Auroran Wall that insta-kills anything it touches. On its own, the boss does 2 attacks consisting of spinning and heavy. The tank should be able to block and deal with the damage from both, while others in the group will need to stay clear.

Eventually the Auroran Wall will spawn and starts making its way across the room. The DPS will need to work together to kill Aurorans in the wall to make enough space for everyone to pass through safely. One dead Auroran should be enough to clear a gap. When the boss puts his 4 swords into the ground, a healing debuff is applied so be prepared for that as this happens frequently.

To get past the wall without dying you will need to kill Aurorans who make up the wall
During the fight there will be a point where the boss will become invulnerable, and will summon 4 Aurorans one in every corner of the room. They will start walking slowly towards the boss. If they reach him, he will have empowered attacks, which is similar to the empowering orbs in the previous Dark Orb fight.
Getting all 4 of them down is impossible, so 2 is a realistic number you should aim for. Do not split up the DPS, as the whole team should focus on the same Auroran. Scintillating Auroran might be the worst of them all, so get it down first and then switch to the other. Here is what each Auroran does:
- Blazing Auroran: grants Meteor Shower and Will-o-Wisp
- Radiant Auroran: grants Radiant Oppression
- Phosphorescent Auroran: grants Ice Pillar that immobilizes
- Scintillating Auroran: grants Spark and Call Lightning

Execute Phase is difficult due to boss healing up at the beginning, with many walls going in all directions as well as the boss having empowered attacks throughout this whole phase
The Execute Phase is very chaotic due to many walls coming at you at once and the Boss being empowered with all 4 Elemental Aurorans. The boss also heals up to about 25% Health when entering this phase. Kite the boss around the walls, DPS while doing so and he should be brought down.
Veteran Mode
Veteran mode introduces some new elements besides the usual more health and damage.The Dark Orb (third boss) is summoned a couple of times throughout the fight and needs to be taken out to stop the empowering boss’ attacks. This is especially problematic at the Execute Phase due to sheer number of Auroran Walls being spawned, that travel in all directions. Also the boss heals up to 50% HP instead the usual 25% he gets in normal mode to make matters worse.
Final Thoughts
Depths of Malatar is not that tough on Veteran except for the last boss. By running every boss 1 or 2 times everything becomes much easier but that is same as with every dungeon. Normal mode can be beaten easily with full CP 200-300 party but for Veteran, proper gear and higher CP levels are required. Last boss is very difficult so do not attempt Veteran if not prepared. Overall this dungeon is a fun challenge with some nasty add pulls and unique bosses.

With this guide you’ll know what to expect going in, so go out there and have fun conquering Depths of Malatar! You can also check out our Frostvault Guide for tackling the other Wrathstone dungeon!
Depths of Malatar Information
- Location: Gold Coast
- Suggested Level: CP 500
- Final Boss: Symphony of Blades
Achievements
- Depths of Malatar Vanquisher
- Title Purified Devastator – Dephts of Malatar Challenger
- ??
- ??
Quests
Depths of Malatar Map
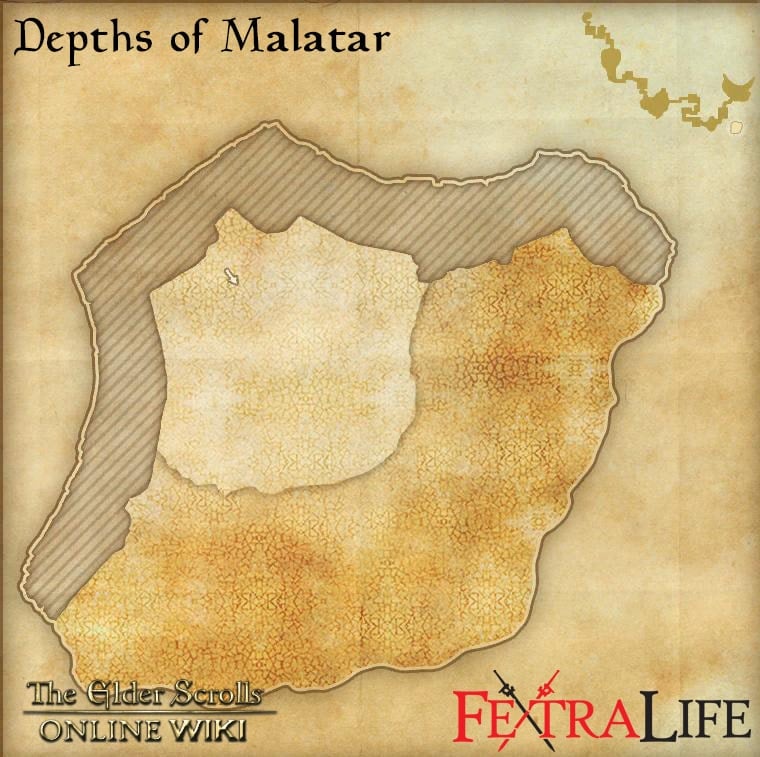
Bosses
- The Scavenging Maw
- The weeping Woman
- Dark orb
- King Narilmor
- Symphony of Blades
Set Drop
NPCs in the area
- Tharayya(Quest Giver)
Notable Items
- ?? Lorebooks
- Material Auroran Dust
Enemies
- Purified warriors
- Imps
- Stone Watcher
- Frost Atronachs
- Radiant warriors
 Anonymous
 Anonymous
LOL I love these guides. Clone one is by far the most difficult, last boss is a breeze.

 Anonymous
during *King Narilmor* tactic, typo, during "Important: A female NPC can be found in one of the corners that sometimes will fight against a ghost. You can and should heal this NPC, because if that NPC dies all the copies will get a big shield on them and they will most likely not be killable anymore and you will wipe. So your healer has to take a look at the Ghosts and heal him." Should probably read 'her' at the end. - delete this post after changes.

 Anonymous


Most people just leaving "Depths of Malatar" in the "normal mode" because it is hard like a "Elite mode".
0
+10
-1