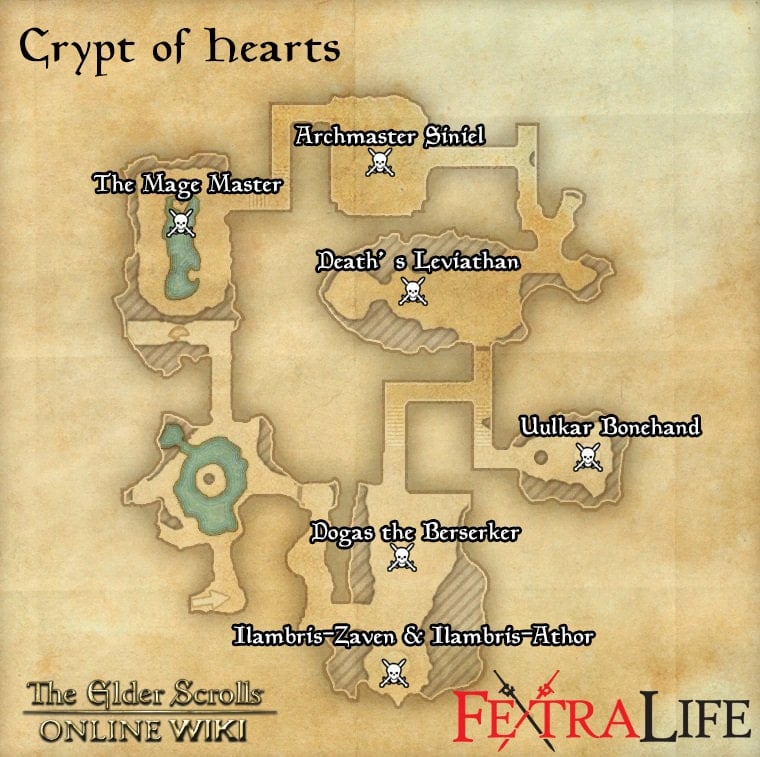
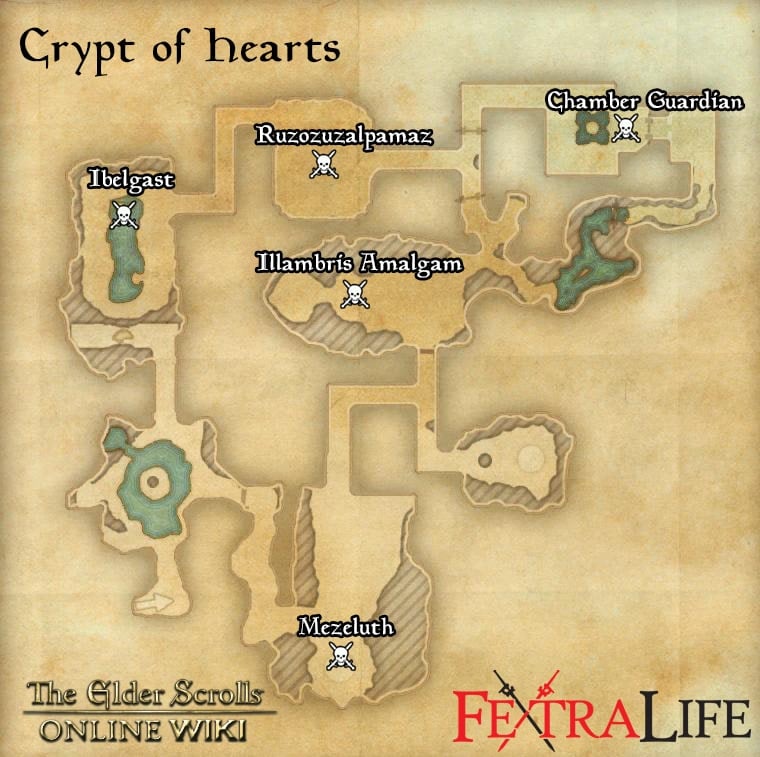
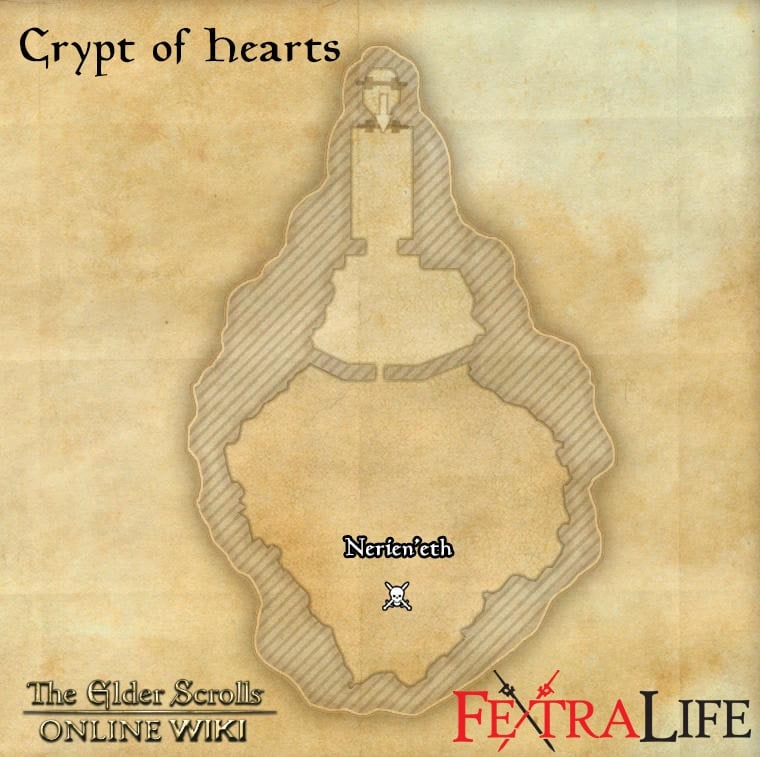
There are multiple versions of this dungeon, please click tabs to see their information, or go to their individual pages.
Crypt of Hearts is the third 4-person dungeon in Elder Scrolls Online for players of the Daggerfall Covenant. It is located towards the south-east in Rivenspire. In Veteran mode, this dungeon is quite possibly the hardest at VR12. Players can use the Group & Activity Finder tool to easily find groups to tackle this dungeon with.
Veteran Walkthrough & Strategies
The Mage Master
Level:
HP:
Boss mechanics
- The Mage Master activates a number of skeleton mage adds around the room as soon as he is engaged. Kill the adds before you focus on the boss.
- The Mage Master has a heavy melee attack that needs to be blocked.
- Mage Master casts a blue bubble in a zone around him. The Spell works in a similar way to a Sorcerer’s Negate Magic, except it doesn’t seem to stun you or silence you. Any debuffs on the boss seem to get dispelled if you stay in the zone.
Archmaster Siniel
Level:
HP:
Boss mechanics
- Archmaster Siniel’s most annoying ability is the AOE Fear. Siniel will fear everyone for a couple of seconds.
- Siniel also keeps on summoning undead with 110 Health. Killing them should be simple.
- Siniel casts an red circle of light-green and black stuff. Stay out of it!
Death’s Leviathan
Level:
HP:
Boss mechanics
- The fight can be divided into two phases. The second phase begins when the boss kneels down at a pillar and picks up a flame buff and basically lights himself on fire. All damage he deals is increased in this phase. It’s unclear to me what triggers this phase; it generally seems to happen when he goes below 50% Health threshold, but it could also be a time based thing.
- The second phase of the fight is what will kill you. Because of this, you can take your time in the first phase & save up your Ultimates and resources for nuking him in the second phase.
- The most dangerous ability Death’s Leviathan has is his quickly expanding red circle. He kneels down and places a red circle beneath him, expanding very quickly in size. It’s very difficult to get out of it in time unless you’re already far away from him. In the first phase the damage isn’t too bad, but once the boss has the fire Buff, it can even one shot players.
- Death’s Leviathan periodically charges in a straight line in front of him, marked with a red path. The charge deals a lot of damage and stuns anyone who gets hit by it. It should be easy to get out of the charge in time. Below 50% the charge also leaves a path of fire behind.
Uulkar Bonehand
Level:
HP:
Boss mechanics
- Uulkar places red circles on the ground. After a few seconds, spikes will spring up from the ground, briefly stunning anyone caught in it and dealing damage.
- Uulkar places runes on the ground which snare players in it. The runes on their own aren't very dangerous, but can cause problems combined with his second ability.
Dogas the Berserker
Level:
HP:
Boss mechanics
- This fight is super easy if everyone in your group uses Immovable. You can also just break free from the stun by using Stamina. You’ll be immune for future stuns for a short while.
- It's strongly suggested that the tank pulls Dogas away from the rest of the group, whilst they take care of the adds. After this it’s all about managing the AOE stun he has. It’s a terrible idea to bunch up in this fight, because everyone will get stunned and he’ll be leeching Health from 4 players.
- Dogas jumps in the air and stuns everyone close to him for 4-5 seconds, leeching Health in the process. This is his main ability and this is something that you need to work out how to counter.
Ilambris-Zaven & Ilambris-Athor
Level:
HP:
Boss mechanics
- Once the fight starts, do not leave the arena or it will restart the fight.
- Zaven will periodically charge a massive fire spell. He’ll engulf himself in flames for a few seconds, and follow up with a spell which sends beams of fire across half the room.
- Zaven also places a red circle beneath him, expanding in size. After a second or two the circle will blow up and cause Flame damage to anyone caught in it.
- Athor casts a lightning spell on the tank, dealing slight damage over time.
- Athor periodically casts lightning runes on the ground. Stay out of them.
- Athor has a melee heavy attack which the tank should block.
- As soon as you engage the fight, Ilambris-Zaven, the fire mage, will go to the middle of the platform and stay there for the duration of the fight.
- Ilambris-Athor is the one the tank should focus on, because he moves and has heavy melee attacks which need to be blocked.
- You should probably kill Zaven first to get rid of the annoying fire spells, but do note that Athor enrages and starts raining down lightning after his brother dies. Because of this, you can split DPS between the two bosses and take them down roughly at the same time, eliminating the lightning pool phase.
- Once Zaven is killed, Athor starts raining down lightning from the sky, filling up a lot of the room with pools of lightning. It’s still quite easy to find enough room to stay out of the bad stuff.
Trivia
- ??
Crypt of Hearts Information
- Location: Rivenspire
- Suggested Level:
- Final Boss: Ilambris-Zaven & Ilambris-Athor
- Achievements:
Achievements
- ??
Quests
Crypt of Hearts Map
Bosses
- The Mage Master
- Archmaster Siniel
- Death’s Leviathan
- Uulkar Bonehand
- Dogas the Berserker
- Ilambris-Zaven & Ilambris-Athor
Set Drop
NPCs in the area
- ??
Notable Items
- ??
Enemies
- ??
Crypt of Hearts 2 is a 4-man dungeon in Elder Scrolls Online located in the Daggerfall Covenant. It is located towards the south-east in Rivenspire. Players can use the Group & Activity Finder tool to easily find groups to tackle this dungeon with.
Veteran Walkthrough & Strategies
Veteran Crypt of Hearts 2 can be challenging. The dungeon has a skeleton theme about it and with it a lot of Undead.
Ibelgast
Boss Mechanics:
- Healer and other ads
- Red Circle AOE at a randomly chosen target.
- Heavy melee attack (uppercut) that can deal large amounts of damage (though rarely fatal).
Strategy:
- Tank should aggro the boss and interrupt any healing attempts by the ads.
- Attack the Healer ads first as they can make the fight unnecessarily longer and more frustrating than it needs to be.
- Only the tank should stay close to the boss. All other group members should focus on the ads and avoid the AOE.
- The boss also casts Negate Magic which as a tank you should break free of as soon as possible as it can make interrupts difficult.
Ruzozuzalpamaz
Boss Mechanics:
- Lightning Strikes that do light damage to the Tank
- Cobweb strangle that is randomly targeted a player leaving him unable to break away by himself.
- Giant AOE red circle that moves with the targeted player.
- Small spider ads that can snare and make it difficult to move around to avoid the boss AOE
Strategy:
- The tank should keep the boss focused away from the team so as to absorb the lightning towards himself. The lightning does minimal damage to the tank.
- Always look out for group members who get cocooned in the Cobweb and release them by hitting "x".
- The Boss AOE can wipe out your entire group if not handled carefully. Let your team know if you are targetted. Avoid running towards or close to other members (especially those cocooned) while escaping the circle that follows you.
- The small spider ads can prove quite annoying while trying to escape the Boss AOE or even when you are helplessly cocooned. It is best to round up the spiders close to the Tank and AOE the spiders to their death.
Chamber Guardian
Boss Mechanics:
- Spectre wave which Fears players
- Heavy Melee attack
- Skeleton ads that spawn throughout the fight
Strategy:
- The Heavy attacks should be blocked by the tank. The tank should also block the Guardian's casts which can have you running about scared.
- Keep the boss facing away from the team to protect them from the Spectre Wave.
- AOE the skeleton ads. It is best to let the Tank focus on the boss while the rest of the team rids of the ads.
Illambris Amalgam
Boss Mechanics:
- 1 blue and 1 red ad (Draemora) that deal lightning (melee with some AOE) and fire (Heat wave fire trails) based damage
- Additional ads named "Big Bone Construct" spawn after the 2 Draemora die. The mobs can use either Frontal cone-AOE or all around (360 degree) AOE stomps that will knockdown players.
- Rain of Fire AOE once the ads are dead.
Strategy:
- Tanks should first aggro both the Draemora, while a DPS works on damaging them one by one until they disappear. Then aggro the boss away from the team so they can avoid the Frontal Cone stomps that can deal some heavy damage on them. NOTE: The blue Draemora (in our opinion) can be dealt with first because he causes more annoyance with the lightning AOE than the red one.
- This fight has a lot of different AOE in play so players should keep moving around.
- DPS should focus on the small Ads while the Tank does his job. Being slow to do this will result in a lot more AOE (as the ads have their own AOE) that can wipe out your entire team.
- At around 20% Health, the boss will enrage and increase the amount of ad spawns and AOE. All players must at this point focus on killing the boss and ignore the ads because they will just continuously spawn.
Mezeluth
Boss Mechanics:
- The boss does not move. You have to attack him on the platform where he stands
- Fire AOE cast on the ground occasionaly
- Other AOEs that put circles around each player, causing those hit to explode and be knocked down.
Strategy:
- Don't stand in more than 1 circle at a time. The explosions would kill you and your group mate. (You can get away with slight overlaps)
- Plan ahead with your teammates. Avoid heading in the same direction as other players. Pick a direction and stick to it.
- Avoid rolling into other players and causing them additional damage.
Nerien'eth
Boss Mechanics:
- Skulls are shot at a random player, doing great amounts of damage and causing a knockdown effect.
- AOE spawns on each player which explodes after a few seconds, dealing the player heavy damage. This can happen up to 4 times in a row.
- Teleportation to a player, followed by a large 360 degree AOE that can deal heavy damage and knock down the player.
- Teleportation to smaller platforms to spawn spirits that turn into Wraiths.
- At 35% Health, the boss uses the sword in the middle of the room to deal heavy melee damage at random to a player.
- Constant Ground AOE throughout the entire fight.
- Stuns every players and then randomly charges at one, draining away all their health. He also gets a damage shield during this phase.
Strategy:
- Always pay attention to the boss animations to get your block up in time for the heavily damaging Skulls attack.
- Stay spread out so you can easily walk out of the AOE that spawns on all the players.
- Run quickly or roll away if the boss teleports on you. (As a Tank, it may sometimes be better to just block and take the hit depending on your stamina supply).
- When the Wraiths appear, Tank should aggro both wraiths while the team DPS the Wraiths.
- If you're charged at after the Stun, you need to use the synergy ‘Resist Necrosis’ which appears on screen.
- The others must DPS the shield. If you do not break the shield, the victim dies, so keep on damaging and avoid the AOE.
Trivia
- Hard Mode is accomplished by not killing any Wraiths in the Nerien'eth until the boss is at 35% and he starts to use the sword.
Crypt of Hearts Information
- Location: Rivenspire
- Suggested Level: 28-31
- Final Boss: Ilambris-Athor & IIambris Zaven
- Achievements: 1
Achievements
- Crypt of Hearts: Defeat Archmaster Siniel, Bone Leviathan and Illambris Twins.
Quests
Crypt of Hearts Map
Bosses
Set Drop
NPCs in the area
- ??
Notable Items
- ??
Enemies
- Banekin
- Bone Colossi
- Flame Atronachs
- Ghosts
- Husks
- Ruzuzuzalpamaz (Spider Daedra)
- Skeletons
- Wraiths
- Zombies
 Anonymous
For me Mezeluth the tank switched to full dps gear. Healer dropped big area heals and burned boss only dealing with one black circle phase .

 Anonymous
Seem's ebony doesnt work the same as willpower , if you get 2 rings only one counts.


IWhichever you kill first, the other will Enrage and fill the arena with lighting pools alternating with their regular attacks. Kill Zaven first, because when enraged he knocks you all over the place, If you run out of Stamina, you won't have time to heal, forget dps.
1
+10
-1